With your baby on the way one of the first things you will need to set up is a baby changing station.


This is where you will change baby’s nappy, do outfit changes, dry them off after bath time and apply cream and sometimes it will be where your baby has fun.
My two used to love playing on their changing mat – even if only for a few minutes after they had a fresh nappy and of course with mummy right there.
Before we get to all of the details about your baby changing station it’s important you know that it does not have to be an elaborate affair.
You don’t have to have a specific piece of furniture just for baby changing.
There are a ton of space, and money, saving options you can use that are just as good.
So no matter what size your nursery is or what your budget for getting all of baby’s stuff, let’s take a look at how to set up a practical baby changing station.
If you want to check out a complete list of essentials for your new baby I have a checklist of everything you need right here.
This post contains affiliate links.
What do you need in a baby nappy changing station?
There are a few essentials for your baby changing station. Most of them are really cheap and are things you may need to purchase regularly such as nappies.
Others such as a bin aren’t necessarily an essential but you will find useful.
Let’s get to the nappy changing essentials:
Changing table
First up the changing table itself.
You do not have to have a changing table but as a new parent you may find a place to change baby’s nappy that is at your waist height is much easier than bending down on the floor.
This is particularly true if you had a C-section and you are struggling to pull yourself up and down from a sitting position.
The changing table should be between 730mm and 800mm off of the ground, according to this company that fits baby change in public places for a living!
While in the first couple of weeks your baby will not be moving very much, it will surprise you just how quickly they start to shuffle and roll.
So you will need to consider safety when locating your changing table in the room – putting it in the corner of a room is best where baby has fewer sides to fall off – and remember never to leave baby alone on the changing table.
Changing mat
Some changing tables may come with a changing mat built in but many do not.
A changing mat is a padded surface that makes it more comfortable for your baby during changing time.
Many will have raised sides to help prevent baby from rolling off of the changing mat.
When shopping for a changing mat look for something that is wipe clean. Not matter how hard you try there may be an accident at some point where the changing mat gets messy – I’ve had many, many changing mat incidents in my time.
Having one that is quick to spray with disinfectant and wipe down is essential.
Changing mat cover
I always used changing mat covers with my changing mat. They do two things, first of all they mean you aren’t putting baby down on a cold, plastic surface (even though changing mats are padded they are made of waterproof material that gets cool) and secondly they soak up any accidents.
Your changing mat cover should be machine washable.
I used these giant muslins as my changing mat covers. I simply folded them and place them on the changing mat. They soaked up so many changing mat wee accidents! They dry extremely quickly at room temperature too once out of the washing machine.
Nappies
When setting up your nappy changing station you need a good supply of newborn and Size 1 nappies to get your started.
I recommend buying 70 newborn nappies – your baby is likely to go through up to 10 a day in the early weeks – and 50 Size 1 nappies to get you started.
If you sign up to an Amazon subscribe and save account then you can get regular deliveries of your favourite nappy brands so that you never have to worry about forgetting to pick some up at the supermarket.
Of course you could opt for reusable nappies instead of disposable ones. This is entirely up to you. Many parents find they prefer the reusable ones and over time it does save you money – although there is a big upfront investment in buying them.
Wipes
You will get through a ton of wipes so you cannot buy too many before baby is born!
Be sure to always have a packet of wipes on the go within reach of the changing station plus another packed close by.
I recommend having a drawer or space underneath the cot where you keep your extra supplies of wipes and nappies.
Then you can have an immediate (smaller) supply within arm’s reach of your changing mat. You’ll just need to top this immediate supply up as and when it runs low.
Bin
We have never owned a nappy bin and I never felt worse off for not having one.
But many parents swear by the nappy bins that trap the bad odours so that the room doesn’t smell of stinky nappies. These normally require refillable cartridges to keep them working so there is an ongoing cost involved that you may want to consider.
If you want to save on the expense then you can have nappy bags (you can buy scented ones) to place the dirty nappies in and then place these in your household bin.
Nappy cream
In the early months your baby is likely to get a sore bottom at some point.
A barrier cream can help soothe a sore butt and also prevent nappy rash by providing a barrier between baby’s skin and their poo and wee.
To prevent nappy rash you need to change baby’s nappy frequently – as soon as you think they have filled the nappy.
It’s a good idea to get into the habit of smearing a little nappy cream on their bum at every nappy change so that you can prevent the nappy rash developing.
TOP TIP: If you don’t want to touch baby’s butt with your finger when applying the cream you could use an old eye make-up brush to gently dab it on. Be sure to wash it regularly!
Baby moisturiser
Baby’s skin is very delicate so use a moisturiser that is appropriate for newborn skin.
I love the Aveeno Baby range of baby moisturisers but there are lots on the market to look out for.
Moisturise baby’s skin after every bath when their skin is still damp to lock in the moisture.
A toy
Once your baby gets a little bigger they will become very wriggly when on the changing mat.
A toy can help to distract them so that you can change their nappy without feeling like you’re wrestling a baby alligator!
Get something small as there isn’t tons of space on the changing mat. A little rattle or teething toy works great.
Spare clothes
It’s a good idea to have a spare change of clothes for baby close by just in case there’s an accident on the changing mat.
You could keep it simple with just a spare vest and a onesie.
Nail clippers
You may want to trim baby’s nails while they are on the changing mat.
To be honest I actually recommend trimming your baby’s nails when they are asleep.
Trying to trim them when they are awake is tricky because they jerk quite a lot. You can get baby nail files which are less nerve-wracking to use when baby is awake. If they suddenly move you won’t worry about hurting them.
Hairbrush
Your baby may not have very much hair right now but have a brush handy just to go over it after bath time.
Look for one with super soft bristles. If your baby has had problems with cradle cap then a cradle cap brush can help to loosen the flakes after a bath.
Muslins
You may want a muslin handy close by just in case baby has a little spit-up so you can mop it up quickly.
I always found it was really useful to have muslins strategically placed around the house just in case.
How to organise a baby changing table
There are a few options when it comes to keeping your baby changing table organised.
When your baby is tiny you may find they and the essential items you need – such as cream and a couple of nappies – fit on the table all together.
But as baby grows and becomes a bit more wriggly you will find they keep grabbing for your changing essentials and it’s not really stuff you want then playing with.
You want whatever you use to organise your nappy changing essentials to be within close reach of your changing station so consider the space and layout of the room where you have it set up.
Here are some ideas for how to organise changing essentials.
IKEA Raskog


The IKEA Raskog is a cheap and flexible option is a really great way to organise all of baby’s stuff within reach of your changing table.
It comes with three shelves and comes in a few different colours. Plus it’s on wheels so is easy to move around the house.
Once your baby is bigger and you no longer need it as a changing table organiser then you can use it as extra storage space in your kitchen or to organise your child’s craft items. I have three of these trolleys and they are so useful.
Basket

I used a basket to organise my second baby’s changing table kit and it was really useful.
This one was from IKEA and had a nice big handle to transport it around if I needed to.
It was roomy and I also really loved the colour.
You could use a wicker basket if it fits with your room decor. Choose something pretty that will blend in which the rest of your baby’s nursery.
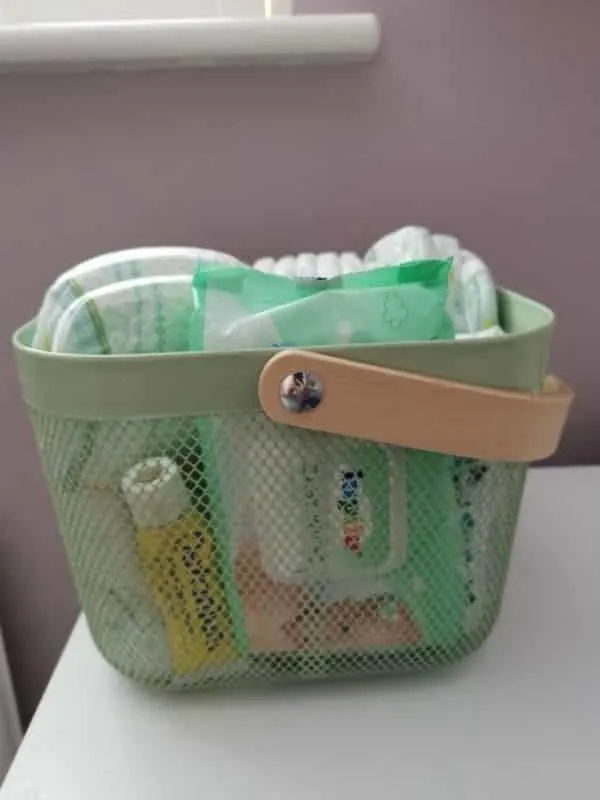
Changing caddy
A changing caddy is a brilliant and cheap way to keep all of your nappy changing kit organised.
They are specifically designed to be used with a changing station and have compartments for all of your essentials including nappies, wipes, cream and brush.
Shelf


You could install a shelf close to where you set up the changing table and pop your nappy change essentials on that.
There are lots of cheap shelves from IKEA that would work great – and if you buy a plain wooden one you could always paint it to fit your nursery decor.
What if you have no space for a changing table
Let’s face it, not every nursery has space for a cot, drawers, toys, a chair and a changing table.
Also it may be an item that you want to cut out of your budget to save money on baby’s first year.
If that is the case then do not worry, you don’t have to have a changing table. In fact given that you may only use it for 18 months or so you would be sensible to consider not buying a piece of furniture that can only be used as a changing table.
Here are some great alternatives to changing tables:
Cot top changer
This is what we had in our baby’s nurseries and I thoroughly recommend it!
It’s a super cheap option – way cheaper than buying a whole changing table – and is an amazing space saver.
A cot top changer sits on top of the railings of baby’s cot.
That’s means it’s super handy for quick nighttime nappy changes and for getting baby ready for bed and putting them down.
There are different cot top changers on the market but most are made of wood. Some may also come covered with plastic with padding to make them soft, or you may have to add a changing mat to the cot top changer to make it comfortable for your baby.
These ones from Mokee are cute.
Changing top
A wooden changing top can be placed on top of any surface, such as a table or chest of drawers.
It has raised sides so that baby is contained and can’t roll off.
It’s a great way to transform a piece of furniture into a changing table!
Cheap changing mat
The super cheap option is to buy a simple changing mat that you can use on the floor.
Simply store it away underneath a sofa or baby’s crib when you are done with it.
As mentioned above, changing your baby while crouched on the floor isn’t great for your back or C-section scar if you have one. So you have want to think twice about this option in that case.
John Lewis does a changing mat for just £13 which is exactly what you need.
IKEA also has a changing mat for just £5!
Can you use a chest of drawers as a changing table?
A chest of drawers can easily be transformed into a changing table!
Check out this beautiful changing station created by Surrey Mama.


Sarah has used a pretty wicker basket as a changing mat which makes it look super stylish and pretty with the other decor in her baby’s bedroom.
A wicker basket is a great option but you could also use one of the wooden changing tops mentioned above.
Simply place it on top of your chest of drawers.
You can then use the top drawers to keep your changing table essentials listed above.
I recommend using small boxes or drawer dividers to make it easier to keep all of your nappy changing essentials organised.
Baby changing station summary
So the key things to think about when setting up your baby changing station are:
- Budget. Think about realistically how much you have to spend and if you don’t have a lot then a simple changing mat is fine, or even better just a towel or muslin on the floor if money is tight.
- Space. There’s no point sacrificing space in a tiny bedroom for a changing unit. You can use a cot top changer or transform the top of a drawer unit instead.
- Practicality. What is the layout of your baby’s room and what is going to work best for you. Remember you want everything you will need for nappy changing within reach.
If you need more top tips for for getting ready for baby then you may also enjoy these posts:
How to prepare your home for baby: Room-by-room checklist

